Building a Mandarin Trainer
Building a Mandarin Trainer
This winter, I built a tool with machine learning to help me practice Mandarin pronounciation. The following is the story of how and why.
Why am I learning Mandarin?
Since October, I've been on an extended sabbatical with my wife. We kicked off our journey in Singapore, but shortly after headed North to explore mainland China.
We were fortunate enough to have some assistance from my wife's older brother, he was willing to lend a hand and guide us through our first trip in China. He had studied and lived in China for a handful of years in the past so was able to help us navigate the cultural and linguistic differences.
Over time, however, the lack of general English knowledge, especially as we left the major cities, had me eager to learn my own basic Mandarin skills so I could be less reliant on his assistance for every basic interaction.
At this point, I had not been working for a number of months, so I used this opportunity to work on a software project between sightseeing in our hotel room, helping me to train Mandarin while also brushing up on some new techniques in machine learning.
Some useful background on Mandarin
Here is some basic details that a Mandarin language learner would need:
✏️ Need to learn a new alphabet (or two)
Mandarin is written in Hanzi, a character-based written script.
Mandarin is written in Hanzi, a logographic written script. Learning a new alphabet can be tough, but logographs have an even steeper learning curve, as there is less of a direct relationship between the way a word is written/read and how it is spoken/sounds.
Phonetic scripts have a direct mapping between the way something is written and how it spoken, whereas a logographic script is focused entirely on the semantic meaning of the word, which can be pronounced in different ways. This is why you can have mutually intelligible characters across Chinese Hanzi and Japanese Kanji characters, but the spoken counterparts can sound entirely different.
Luckily for me, scholars over the past 100 years have developed phonetic schemes to create a mapping of standard Chinese sounds into Latin characters, the most prominent of these being "Hanyu Pinyin" (or just Pinyin). This is the source of a lot of the words familiar to us such as names like "Beijing" (technically the Pinyin form of 北京 is Běi jīng, but we will get to that later).
<div class="center">
<img src="/img/building/building-5.png"
    alt="Pinyin initials and finals" width="300px">
<p class="sub">List of all possible Pinyin "initials" and "finals"</p>
</div>
Practically speaking, this means Pinyin is a great tool for foreign speakers to learn to pronounce words, and learners often focus on Pinyin while first learning to speak Mandarin before (or in parallel to) attempting to fully tackle the Hanzi script.
Here's a small example of Pinyin that may demonstrate why it can be helpful
The word for small/little in hanzi is written as 小. In Pinyin, this is spelled xiǎo, which a Pinyin reader would know to pronounce roughly like "syau" (for now we will ignore the little "hat" above the 'a'). To underline why Pinyin can be useful for new speakers, the Hanzi characters 姕, 栠, 洨, and many other are roughly pronounced like "syau", too, each with distinct definitions.
But even if you ignore Hanzi and focus entirely on Pinyin, there is still a learning curve. For example, you notice that "syau" is not exactly how an English speaker would immediately think to pronounce xiǎo. This is because while Pinyin uses familiar Latin characters, it is a distinct mapping of these characters to phonemes curtailed to Mandarin because...
🔈 Mandarin has unique sounds for the ears (and mouth)
I natively speak English , have studied Spanish to a college level, and am an intermediate Hindi speaker, but even across these languages, there are some sounds in Mandarin that are entirely foreign to my ears.
So while Latinization schemes like Pinyin attempt to map our Latin characters to standard Chinese sounds, it's important to keep in mind that they are referring to a slightly unique set of sounds (some of which either don't exist or are extremely uncommon in English)
For example, the Pinyin character “x” represents a sound that is entirely distinct from the "x" we are familiar with in words like "xylophone" or "mix". The Pinyin "x" could be best approximated as a “sya” sound - but in reality it's more like saying the English "sh" with the tip of your tongue down behidn your lower teeth, but the middle of your tongue rising to the roof of your mouth. This feels very awkward for a non-native speaker. (You know you are on the right track if you can pronounce it while smiling which is very difficult for the traditional "sh" sound in English.)
Other tricky sounds for learners are those represented in Pinyin as "j", "q", "sh", "ch", and "zh", and if you are curious to learn more about these, check out this article.
Now what about the little symbol above the "a" in xiǎo...
🎶 Mandarin is a tonal language - pitch matters!
Tonal languages are often very difficult for language learners, because it introduces an entirely new dimension to the spoken form - pitch.
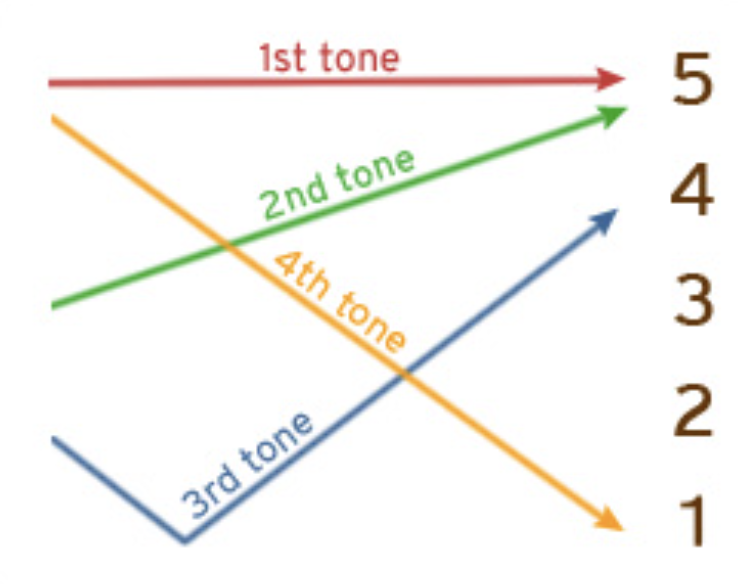
Chart showing Mandarin tones
In English and other languages I am familiar with, semantic meaning is based on the vowel/consonant sounds, and tone/pitch is used to convey additional meaning or nuance - like a rising tone near the end of a sentence suggesting a question.
In tonal languages like Chinese, Vietnamese, and Thai, tones are specific for each syllable, and can entirely change the meaning of the word! One advantage here, is that once you learn to pronounce a given syllable (like our example "xiao"), you actually are learning to pronounce a handful of different words, granted you have learned to control your tones.
In standard Mandarin there are 4 tones (and a fifth "neutral" tone), denoted with different diacritic marks in Pinyin:
- Tone 1: ā (high pitch)
- Tone 2: á (rising pitch)
- Tone 3: ǎ (dipping pitch)
- Tone 4: à (falling tone)
- Tone 5: a (neutral tone)
So back to our example: the diacritic atop the a in xiǎo denotes that it is the third tone (“dipping tone”).
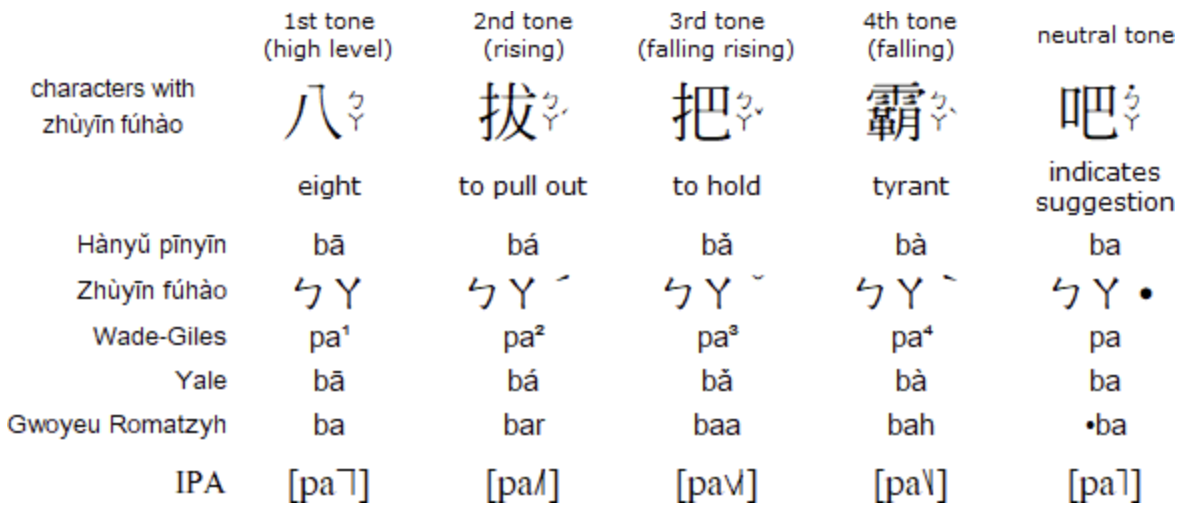
Comparison of different tones for the syllable "ba"
While this may seem like something you can ignore for starters, it is actually crucial to learn because in pitch is used to distinguish between words with entirely different meanings in tonal languages! If I pronounce xiao in first tone instead of the third, it can mean the verb "to disappear or vanish."
Another example is that 妈 (mā, first tone) means mother while 马 (mǎ, third tone) means horse -- certainly an awkard substitution to make.
Exploring the App Store
So to summarize, I needed to learn to:
- Read in a new character-based writing system (hanzi), or at the least a new Latinization scheme (Pinyin).
- Identify and produce four different "tones"
- Identify and produce new sounds
So naturally, I started to look for apps to help me learn all of this!
Mobile apps were really helpful when learning the basics. I made relatively fast progress on being able to recognize basic Hanzi characters with Chineasy's mnemonics, and HelloChinese gave me great practice with speaking basic sentences, but per my Mandarin-speaking brother-in-law, I still had lots of ambiguity when trying to pronounce certain words even when written in Pinyin if they used more difficult sounds. Also, I needed to practice my tones.
So I set out to build a tool to help me focus on learning how to better speak the different syllables possible in Pinyin. My goal was to be able to understandably pronounce an unknown word if I was provided a Pinyin spelling (e.g. from Google translate or an online phrasebook)
Designing the tool
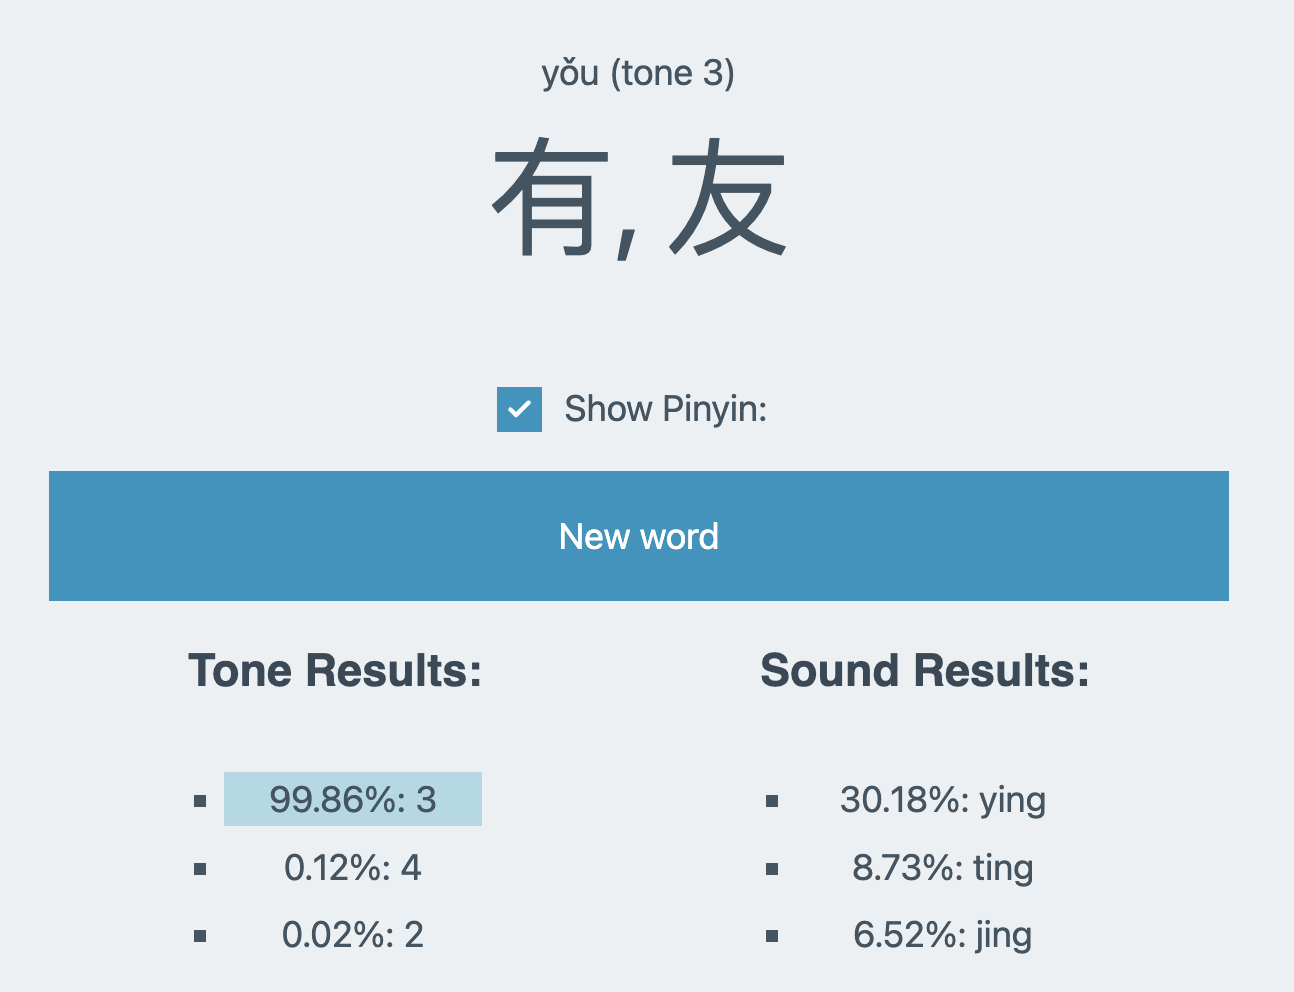
Idea: build a software tool that can show me a Pinyin syllable (at random) and rate my pronounciation (including tone!)
For this I would need an audio classifier that could categorize my speech sample into a predicted Pinyin spelling as well as tone -- a classifier that can both distinguish mā from mǎ and also qiào from jiào.
Given the sublety of these differences, and the explicit goal of building my pronounciation skills, I was concerned that I would not be able to use a traditional speech-to-text tool. A standard speech-to-text (STT) or automatic speech recognition (ASR) model is focused on speech transcription, and so it's primary goal is to infer valid language from a given audio input.
For an example as to why that would not suit my exact needs, consider that "nǐ hǎo" means "hello" in Mandarin, and if I pronounce it "Nì hào", I need a classifier that tells me that I am correct in sound but incorrect in both tones. A traditional Mandarin ASR model would likely automatically correct this to nǐ hǎo (since it's goal is to understand speech and output valid Mandarin, not to provide feedback for the speaker and teach pronouncation)
Finding data
So I started looking for datasets. If I was going to solve this problem, I would need data that could help me train a model to distinguish between different tones and syllables.
When I stumbled upon the Michigan State University Tone Perfect dataset, I felt I had struck gold!
Here was a dataset comprising 9840 audio files, with 6 different speakers recording each of the 410 different possible monosyllabic sounds in Mandarin, once in each of the 4 tones -- it was perfect!
This was exactly the data I needed: striking the balance of specificity (focus on the Mandarin/Pinyin syllables, not full words) and enough speaker diversity to not overtrain on a given speaker/accent.
With data in hand, I now needed to choose a model architecture..
Choosing a model architecture
In prior years, I had self-studied machine learning out of interest by finishing the fast.ai Practical Deep Learning for Coders course, and done some of the Kaggle Learn courses. With these courses, I was brushed up on the basics of simple machine learning, as well as the use and construction of some common neural network architectures.
In 2023, I completed the HuggingFace Audio Course, where I learned the basics of using Transformers to perform audio tasks like music genre classification and speech recognition. While my original idea was to apply some of the audio techniques to music production and composition, this course ended up being the perfect background for this Mandarin project!
Looking back at the course materials, I determined that the most pragmatic choice for my model would be based on Meta AI's HuBERT model . Similar to Google's BERT model on which it is based, HuBERT is a pre-trained foundation model that provides a powerful starting point for speech analysis.

HuBERT Architecture
I decided to follow the HF course's suggested path and start with the smaller, distilled "DistilHuBERT" for faster iteration and cheaper training runs.
Putting it into practice
The beauty of using a pretrained foundation model is that most of the heavier compute has been done already, an off-the-shelf HuBERT-style model is readymade to interpret speech audio and output useful numerical/vector representations that can be then trained for further tasks. The only step for me to do would be to build new neural network layers on top of this model, effectively using it as a feature extractor upon which I can train a simple classifier based on the output vectors.
For my initial attempt, I decided to add one additional simple linear layer to the neural network, which I would train to classify the audio input into one of the 1640 unique classes of Mandarin sound (1640 is 410 sounds, each in 4 different tones). This meant my goal would be to train the connections between each of the output neurons of the final layer of the pretrained DistilHuBERT model and the 1640 output neurons that represent my 1640 target classes.
In this case, I would split my dataset into a training set and a validation set to perform supervised learning on my neural network. The hope is that with a well executed series of training runs to create a model that is to classify input sounds into the 1640 categories, helping to "grade" my pronounciation.
Tooling/environment
Following the example of many data science and machine learning practitioners, I started with Python for my language of choice embedded in a Jupyter notebook, for interactivity and simpler exploratory data analysis. To host the notebook, I landed on Google Colab with its hosted notebook offering, for an an easy (and free) way to get access to GPUs for training and an isolated cloud-hosted development environment.
For my machine learning setup, I decided on HuggingFace Transformers, as it was a familiar and simpler way to get started on training PyTorch or TensorFlow models, and provided easy APIs for me to pull and work from large pretrained models.
Data pre-processing
With both dataset and architecture in hand, it was now time to start the important first step of any machine learning project: preparing the data.
The Tone Perfect dataset has exactly the information I need, but it was now time to transform it into the most convenient and efficient structure(s) for my model training. The dataset came with a folder structure of audio files, each with an associated XML file containing metadata mapping it to various tags, most important to me: tone number, pinyin representation, and speaker ID (among other fields).
For my usage, it made most sense to have one single CSV file that
comprised the metadata for the whole dataset that I could parse with
pandas , so I processed each
of the XML files and appended the relevant information into one large
CSV.
import xml.etree.ElementTree as ET

CSV_PATH = f"{PATH}/simplified_data.csv"
XML_DIRECTORY = f"{PATH}/tags"

def simplify_xml(file_path):
tree = ET.parse(file_path)
root = tree.getroot()

simplified_data = {
    'sound': root.find('sound').text,
    'tone': root.find('tone').text,
    'pinyin': root.find('pinyin').text,
    'character': [char.find('simplified').text for char in root.findall('character')],
    'speaker': root.find('speaker').text
}
return simplified_data

def process_xml_files(xml_directory):
print(f'Processing dir: {xml_directory}')
data_list = []
for xml_file in os.listdir(xml_directory):
    if xml_file.endswith('CUSTOM.xml'):
    xml_path = os.path.join(xml_directory, xml_file)
    simplified_data = simplify_xml(xml_path)
    data_list.append(simplified_data)

return data_list

def save_to_csv(data_list, csv_path):
df = pd.DataFrame(data_list)
df.to_csv(csv_path, index=False)

if os.path.exists(CSV_PATH) and os.path.getsize(CSV_PATH) > 0:
df = pd.read_csv(CSV_PATH)
print(df.head())

else:
print(f'CSV file {CSV_PATH} does not exist or is empty.')
data_list = process_xml_files(XML_DIRECTORY)
save_to_csv(data_list, CSV_PATH)
Next, I needed to split the data into subsets, one for training (where errors would backpropogate and update the weights of the model) , one for validation (to track the training progress as I repeatedly train on the training set), and one for testing (which will never be used, until the very end, to evaluate the model on previously unforeseen data).
First, I split the data randomly so that of each of the 6 different examples for each tone/syllable combination, two random samples would be reserved for validation/test respectively, with the remaining 4 used for training.
The sanctity of the datasets is very key, as any bias in the training set will ultimately be magnified by the training process. So I did some basic visualizations to validate how balanced and appropriate my splits seemed across different axes, and noticed that there was an uneven split of speakers. For whatever reason, my naive random splitting had lead to my training set having nearly 2x the audio samples for one speaker, and heavily underrepresenting another.
This could introduce some confusing bias to the trained model, such as possibly introducing gender or accent bias, so I decided to try splitting again, this time by speaker first, and then randomly, ensuring an even representation of speakers in training, validation, and test.
# load csv
data_df = pd.read_csv(CSV_PATH)
grouped = data_df.groupby('pinyin')
print(grouped.size())

train_df, validate_df, test_df = pd.DataFrame(), pd.DataFrame(), pd.DataFrame()

counter = 0

# Rotate speakers for each group, ensuring even split of speakers in each set
for name, group in grouped:
  speakers = group['speaker'].unique()
  rotated_speakers = np.roll(speakers, shift=-counter)
  validate_df = pd.concat([validate_df, group[group['speaker'] == rotated_speakers[0]]])
  test_df = pd.concat([test_df, group[group['speaker'] == rotated_speakers[1]]])
  train_df = pd.concat([train_df, group[group['speaker'].isin(rotated_speakers[2:])]])
  counter += 1  # Increment counter for next round-robin

# Save train/validation/test splits into CSV for future runs
for set_name, set_df in zip(['train', 'validate', 'test'], [train_df, validate_df, test_df]):
  set_dir = os.path.join(PATH, set_name)
  os.makedirs(set_dir, exist_ok=True)
  for index, row in set_df.iterrows():
      src_file = f"{PATH}/audio/{row['sound']}{row['tone']}_{row['speaker']}_MP3.mp3"
      dst_file = f"{set_dir}/{row['sound']}{row['tone']}_{row['speaker']}_MP3.mp3"
      shutil.copy(src_file, dst_file)
  set_csv_path = f"{PATH}/{set_name}_metadata.csv"
  set_df.to_csv(set_csv_path, index=False)
Preparing to train
With the datasets ready, it was now time to prepare other helpful functions for training.
Since my model was based on one from the HuggingFace Hub, I was able to use the HuggingFace Transformers library’s handy AutoFeatureExtractor to handle pre-processing the data files into the right format.
def get_feature_extractor(model_id):
  return AutoFeatureExtractor.from_pretrained(
    model_id,
    do_normalize=True,
    return_attention_mask=True)

model_id = "ntu-spml/distilhubert"
feature_extractor = get_feature_extractor(model_id)
sampling_rate = feature_extractor.sampling_rate
Then I wrote some helper functions to map between labels (for humans) and numerical id’s (for the neural network). I ended up using the pinyin spelling (including diacritics/tone markers) as my label and an integer between 0-1639 as my numerical ID.
pinyin_mapping = {}
  for _, row in train_df.iterrows():
    pinyin = row['pinyin']
    pinyin_mapping[pinyin] = {
        'sound': row['sound'],
        'tone': row['tone'],
        'character_simplified': row['character_simplified']
    }

# encode the labels
unique_pinyin = train_df['pinyin'].unique()
id2label = {i: label for i, label in enumerate(unique_pinyin)}
label2id = {label: i for i, label in enumerate(unique_pinyin)} </code></pre>
        <p>Then I loaded the datasets using the CSV I created earlier and
          started my first training run with HuggingFace Transformers by creating and loading datasets, preprocessing audio, and defining my training hyperparameters..</p>

        <pre><code class="language-python"># Load the Mandarin dataset
def load_dataset(csv_path):
    return pd.read_csv(csv_path)

def construct_file_path(row, set_name):
    return f"{PATH}/{set_name}/{row['sound']}{row['tone']}_{row['speaker']}_MP3.mp3"

def load_audio(file_path, sampling_rate):
    y, _ = librosa.load(file_path, sr=sampling_rate)
    return y

def cast_audio(data_df, sampling_rate, set_name):
    data_df['audio'] = data_df.apply(lambda row: load_audio(construct_file_path(row, set_name), sampling_rate), axis=1)
    data_df['sampling_rate'] = sampling_rate  # Adding a sampling_rate column
    return Dataset.from_pandas(data_df)


train_dataset = cast_audio(train_df, sampling_rate, 'train')
validate_dataset = cast_audio(validate_df, sampling_rate, 'validate')
test_dataset = cast_audio(test_df, sampling_rate, 'test')

train_dataset = train_dataset.rename_column('pinyin', 'label')
validate_dataset = validate_dataset.rename_column('pinyin', 'label')
test_dataset = test_dataset.rename_column('pinyin', 'label')

def preprocess_audio(examples):
    audio_arrays = [x for x in examples["audio"]]  # assuming examples["audio"] is a list of numpy arrays

    labels = [label2id[label] for label in examples["label"]]  # Convert labels to integer IDs

    inputs = feature_extractor(
        audio_arrays,
        sampling_rate=feature_extractor.sampling_rate,
        max_length=int(feature_extractor.sampling_rate * max_duration),
        truncation=True,
        return_attention_mask=True,
    )
    inputs["labels"] = labels  # Include labels in the returned dictionary
    return inputs

# Dataset Mapping
train_dataset_encoded = train_dataset.map(
    preprocess_audio,
    remove_columns=["audio", "sound", "tone", "character_simplified", "speaker", "sampling_rate", "label"],
    batched=True,
    batch_size=100,
    num_proc=1,
)

validate_dataset_encoded = validate_dataset.map(
    preprocess_audio,
    remove_columns=["audio", "sound", "tone", "character_simplified", "speaker", "sampling_rate", "label"],
    batched=True,
    batch_size=100,
    num_proc=1,
)

test_dataset_encoded = test_dataset.map(
    preprocess_audio,
    remove_columns=["audio", "sound", "tone", "character_simplified", "speaker", "sampling_rate", "label"],
    batched=True,
    batch_size=100,
    num_proc=1,
)

# Model Initialization
num_labels = len(id2label)

model = AutoModelForAudioClassification.from_pretrained(
    model_id,
    num_labels=num_labels,
    label2id=label2id,
    id2label=id2label,
)

# Training Setup
model_name = model_id.split("/")[-1]
batch_size = 64
gradient_accumulation_steps = 1
num_train_epochs = 16


training_args = TrainingArguments(
    f"{model_name}-finetuned-mandarin",
    evaluation_strategy="epoch",
    save_strategy="epoch",
    learning_rate=1e-4,
    per_device_train_batch_size=batch_size,
    gradient_accumulation_steps=gradient_accumulation_steps,
    per_device_eval_batch_size=batch_size,
    num_train_epochs=num_train_epochs,
    warmup_ratio=0.1,
    logging_steps=5,
    load_best_model_at_end=True,
    metric_for_best_model="accuracy",
    # fp16=True,
    push_to_hub=True,
    # lr_scheduler_type="linear",
    lr_scheduler_type="cosine",
)

# Metric Computation
metric = evaluate.load("accuracy")

def compute_metrics(eval_pred):
    """Computes accuracy on a batch of predictions"""
    predictions = np.argmax(eval_pred.predictions, axis=1)
    return metric.compute(predictions=predictions, references=eval_pred.label_ids)

# Model Training
trainer = Trainer(
    model,
    training_args,
    train_dataset=train_dataset_encoded,
    eval_dataset=validate_dataset_encoded,  # Use the validation dataset for evaluation during training
    tokenizer=feature_extractor,
    compute_metrics=compute_metrics,
)
Initial results - not great!
This first attempt got me to....12% accuracy. While this is not *horrible* compared to random chance (1/1640 = 0.06%), I was convinced that given the dataset that I could do better!
Epoch	Training Loss	Validation Loss	Accuracy
1 	    7.328600	    7.321718	    0.004268
2	    6.908100  	    6.755133      	0.009146
3 	    6.381600  	    6.228704      	0.015244
4   	6.065700  	    5.860804      	0.027439
5 	    5.755700    	5.597661       	0.031707
6   	5.553400    	5.413438     	0.053049
7   	5.422000    	5.270103       	0.073171
8   	5.255000    	5.162357       	0.098780
9	    5.144200  	    5.097740       	0.120122
10      5.014600  	    5.076348  	    0.122561
Refinements: larger batches, more epochs, data augmentation
Looking closer at the epoch-by-epoch results, while the final accuracy was low, both the training loss, validation loss, and accuracy were improving epoch over epoch - suggesting that there was still room to train further. I started with very conservative numbers: a batch size of 8, and only 10 epochs. I could certainly stand to increase these. Normally you would stop training when your validation loss starts to level out, even if the training loss is still reducing (which could suggest overfitting to the training data).
In addition to not training enough epochs, I didn't perform any data augmentation, the standard practice to “create more data” by doing context-specific transformations to your training data that don’t change the overall “meaning”. I was familiar with this in image classification scenarios, where it's often done with stretching/rotating/flipping. For example, if building a model to classify dog breeds, your training data probably has lots of pictures of dogs tagged with their breed. If your model *also* sees slightly cropped, rotated, stretched, or flipped versions of these images, the breed labels would still apply. This technique can build a much more robust model that can exceed the diversity of the raw dataset alone.
With audio data, I figured I could add minor white noise to my samples to create new subtly different versions of each file, effectively doubling my training data size. This would also help my model be more resilient to noisy audio, as I can’t guarantee that my microphone would sound as good as the studio recordings from the dataset.
def add_white_noise(audio, noise_level):
  noise = np.random.randn(len(audio))
  augmented_audio = audio + noise_level * noise
  return augmented_audio.astype(type(audio[0]))
Adding more training epochs and creating copies of my dataset with white noise applied made a huge difference, and after 20 epochs I reached ~46% accuracy - pretty good!
Also, it now looks like we are reaching some sort of limits, as the final few epochs seem to level out (and even regress a bit on the last one). This suggests that I have squeezed out most of the potential value from the data and the setup as I have prepared it. So I figured - why not augment the data more!
After some preliminary research, I made the dataset even larger by adding data augmentations like time stretching (playing the audio slower/faster) and pitch shifts (playing the audio at lower/higher pitches) which together somewhat approximate different "voices" and speaking styles - hopefully helping the model to abstract beyond the specific examples/speakers that I have in the dataset. The trick to data augmentation is to think about how the data can be changed without changing the ultimate label. In this case, the audio files that say "qiào" would still be classified as "qiào" by a native speaker, even if they are spoken with background noise, at a different speed, or at a different pitch.
I now had the following 9 augmentations, each the same size as the initial dataset: Raw audio, 5% white noise, 10% white noise, 15% white noise, 20% white noise, Time stretch x0.7, Time stretch x1.5, Time stretch x2.0, Pitch shift +2, Pitch shift -2
This helped me 10x the dataset, from 9,840 audio files to 98,400. I made sure not to stretch or shift too far, as this may be risk no longer approximating real speech.
And the result? 86% accuracy! Data augmentation really works.
Epoch	Training Loss	Validation Loss	Accuracy
1	    6.821200	    6.759167	    0.005488
2	    5.426600	    5.336673	    0.042073
3	    4.400000	    4.364198	    0.126220
4	    3.325400	    3.309738	    0.261585
5	    2.587900	    2.572594	    0.384756
6	    1.963700	    2.010923	    0.540244
7	    1.558500	    1.571427	    0.651220
8	    1.119900	    1.248942	    0.728659
9	    0.817400	    0.991766	    0.782317
10	    0.606300	    0.805460	    0.826829
11	    0.424000	    0.694638	    0.841463
12	    0.358800	    0.611375	    0.856098
13	    0.284600	    0.564713	    0.861585
14	    0.236900	    0.537281	    0.863415
Let's reimplement the model, this time in Pytorch
To this point, I had been using HuggingFace's Transformers library to built upon the pretrained DistilHuBERT model. At this point I was convinced I could get to the 95% level, so I took the following steps:
- Use Pytorch instead of the HuggingFace Transformers library. I was
using
AutoModelForAudioClassification.from_pretrained()to pull the pretrained ntu-spml/distilhubert model, which was very convenient for getting started, but I was ready for full control of the model with PyTorch. - Use the full HuBERT architecture rather than DistilHuBERT to see if any gains can come from the larger neural network. This would require more resources for training, and would make the training loops take longer, but at this point I had a really good start and could afford to make some more costly bets on overnight training runs.
- Split the tone classification and sound classification into two different classifiers. Rather than 1 linear layer classifying between 1640 classes, I would have 2 parallel linear layers, one classifying 4 tones, and the other classifying the 410 sounds. This two-headed classifier would help me to hone-in on which portion the model is having difficulty with, and also give me the flexibility to even use different training hyperparameters for these two separate (but similar) tasks, and train them separately, if needed.
- Move on from Google Colab to a paid GPU solution from SaturnCloud With my extensive data augmentation exploding the size of the training set and the choice of the full HuBERT backbone model, each epoch would take significantly longer, and I would need to use a solution that could provide me GPUs for training longer than 90 minutes of idle time. Even with the paid version of Google Colab, I would get timed out if the browser was idle for a few hours, and this lead to a few frustrating failed training runs overnight. At this point, I was willing to pony up the hourly charges and the transition effort to move to a dedicated GPU offering.
Implementing HuBERT in Pytorch
Luckily most of my work on the dataset etc. could be reused, I just needed to define a new model and change the training and evaluation code.
First I defined a new model class for my Pinyin model, which took as a parameter a backbone model and built new layers on top for tone and sound classification.
class PinyinModel(nn.Module):
  def __init__(self, backbone, num_tones, num_sounds):
      super().__init__()
      self.backbone = backbone
      self.tone_classifier = nn.Linear(768, num_tones)
      self.sound_classifier = nn.Linear(768, num_sounds)

  def forward(self, input, lengths=None):
      # Pass input through the Wav2Vec2 backbone
      features, _ = self.backbone(input, lengths)
      # features = self.backbone.feature_extractor(input)
      # projected_features = self.backbone.encoder.feature_projection(features)

      # Classify tone and sound
      tone_output = self.tone_classifier(features.mean(dim=1))
      sound_output = self.sound_classifier(features.mean(dim=1))

      return tone_output, sound_output</code></pre>

      <p>Then I needed to instantiate the model, first grabbing the HUBERT_BASE model from torchaudio for my backbone.  Next, I unfroze the last layers (tone_classifier and sound_classifier) so that their weights, which are currently just random numbers, can be updated by backpropogation throughout the my training runs.</p>

      <pre><code class="language-python">hubert = torchaudio.pipelines.HUBERT_BASE.get_model()

num_tones = 4
num_sounds = 410
pinyin_model = PinyinModel(hubert, num_tones, num_sounds)

# Unfreeze the last layers if you want to fine-tune them
for param in pinyin_model.tone_classifier.parameters():
    param.requires_grad = True
for param in pinyin_model.sound_classifier.parameters():
    param.requires_grad = True
More flexible data augmentation (on the fly)
In my last attempts, I augmented my datasets by running a specific augmentation across the entire dataset and saving a new copy of the entire dataset for each augmentation, increasing my dataset size. This was useful at first, since it helped me to do all of the audio processing upfront, but it made it costly in terms of effort to change or create new augmentations.
This time, I created a custom MandarinDataset class which overrode the __getitem__ function to perform augmentations on-the-fly as samples were pulled. This gave me more flexibility in changing my data augmentation strategy without having to perform large batches of audio transformation up front and greatly reduced my disk requirements.
With this new approach, I was able to experiment with a handful of different augmentation strategies and combinations, ultimately landing on time stretching, white noise, low-pass filtering (LPF, removing high frequencies), and then some cases where I combined one or more of these.
class MandarinDataset(Dataset):
  def __init__(self, dataframe, base_path, set_name, sampling_rate, apply_augmentation=False):
      self.dataframe = dataframe
      self.base_path = base_path
      self.set_name = set_name
      self.sampling_rate = sampling_rate
      self.target_length = int(2.0 * sampling_rate)  # 3 seconds * sampling rate
      self.apply_augmentation = apply_augmentation
      self.cutoff_freq = 2800
      self.noise_percent = 0.035


  def __len__(self):
      return len(self.dataframe)

  def perform_augmentation(self, audio, sr):
      augmentation_type = random.choice(['plain', 'stretch', 'noise', 'lpf', 'noise_lpf', 'all'])
      # augmentation_type = random.choice(['all'])
      # print(f"Augmentation: {augmentation_type}")

      # if isinstance(audio, np.ndarray):
      #     audio = torch.from_numpy(audio)

      if augmentation_type == "plain":
          return audio
      if augmentation_type == 'stretch':
          # Time stretching
          stretch_factor = random.choice([1.1, 0.9])
          audio = librosa.effects.time_stretch(audio.numpy(), rate=stretch_factor)
          return torch.from_numpy(audio)


      elif augmentation_type == 'noise':
          # Add white noise
          noise = torch.randn_like(audio) * self.noise_percent
          audio += noise
          return audio

      elif augmentation_type == 'lpf':
          # Low pass filter
          B, A = butter(6, self.cutoff_freq / (sr / 2), btype='low')
          audio = lfilter(B,A,audio)

      elif augmentation_type == 'noise_lpf':
          # Add noise and then apply low pass filter

          noise = torch.randn_like(audio) * self.noise_percent
          audio += noise
          B, A = butter(6, self.cutoff_freq / (sr / 2), btype='low')
          audio = lfilter(B,A,audio)

      elif augmentation_type == 'all':
          stretch_factor = random.choice([1.1, 0.9])
          noise = torch.randn_like(audio) * self.noise_percent
          B, A = butter(6, self.cutoff_freq / (sr / 2), btype='low')
          audio += noise
          audio = librosa.effects.time_stretch(audio.numpy(), rate=stretch_factor)
          audio = lfilter(B,A,audio)
      return torch.from_numpy(audio)

  def __getitem__(self, idx):
      row = self.dataframe.iloc[idx]
      file_path = f"{self.base_path}/{self.set_name}/{row['sound']}{row['tone']}_{row['speaker']}_MP3.mp3"
      audio, sr = torchaudio.load(file_path, normalize=True)

      # Resample audio to 16 kHz if necessary
      if sr != self.sampling_rate:
          # print(f"resampling {file_path} from {sr} to {self.sampling_rate}")
          resampler = torchaudio.transforms.Resample(orig_freq=sr, new_freq=self.sampling_rate)
          audio = resampler(audio)

      # Convert audio to PyTorch tensor if it's a numpy array
      if isinstance(audio, np.ndarray):
          # print(f"{file_path} loaded as nparray, converting to torch tensor")
          audio = torch.from_numpy(audio)


      # Apply augmentation
      if self.apply_augmentation:
          audio = self.perform_augmentation(audio, self.sampling_rate)

      # Check the current length of the audio and log it
      current_length = audio.shape[1]
      # print(f"{file_path} Original Length: {current_length} samples")

      # Play original audio (for testing)
      # print("Playing Original Audio:")
      # ipd.display(ipd.Audio(audio.numpy(), rate=self.sampling_rate))

      # If the audio is shorter than the target length, pad it
      if current_length < self.target_length:
          pad_amount = self.target_length - current_length
          audio = torch.nn.functional.pad(audio, (0, pad_amount))
      elif current_length > self.target_length:
          audio = audio[:, :self.target_length]

      # Log the length after adjustment and play it
      adjusted_length = audio.shape[1]

      # Map tone and sound labels to their respective indices
      tone_label = tone2id[row['tone']]
      sound_label = sound2id[row['sound']]

      return {
          "audio": audio,
          "tone_label": torch.tensor(tone_label, dtype=torch.long),
          "sound_label": torch.tensor(sound_label, dtype=torch.long)
      }
Training with Pytorch
Lastly, I needed to add to my training code a bit, as the HuggingFace Transformers library had abstracted away a lot of the setup by providing good defaults.
And for the training itself, I chose to do 100 epochs, and I ended up with my best results yet!
from torch.optim.lr_scheduler import CosineAnnealingLR
from sklearn.metrics import precision_score, recall_score, f1_score
import os
import random
import time

patience_threshold = 2
checkpoint_dir = './data/models/checkpoints/unfrozen'

def train_and_validate_model(model, train_loader, val_loader, criterion, optimizer, epochs=20):
    model.to(device)
    scheduler = CosineAnnealingLR(optimizer, T_max=epochs)

    best_val_loss = np.inf
    early_stopping_counter = 0

    if not os.path.exists(checkpoint_dir):
        os.makedirs(checkpoint_dir)


    for epoch in range(epochs):
        start_epoch_time = time.time()  # Start time for the epoch

        # Training Phase
        model.train()
        train_loss = train_one_epoch(model, train_loader, criterion, optimizer)

        # Validation Phase
        model.eval()
        val_loss, val_acc_tone, val_acc_sound = validate_model(model, val_loader, criterion)

        # Calculate and print the time taken for this epoch
        end_epoch_time = time.time()
        epoch_duration = end_epoch_time - start_epoch_time
        print(f"Epoch {epoch+1} completed in {epoch_duration//60:.0f}m {epoch_duration%60:.0f}s")

        # Logging
        print(f"\nEpoch: {epoch+1}/{epochs}\n\tTrain Loss: {train_loss}\n\tVal Loss: {val_loss}\n\tVal Acc Tone: {val_acc_tone}\n\tVal Acc Sound: {val_acc_sound}\n")

        # Early Stopping Check
        if val_loss < best_val_loss:
            best_val_loss = val_loss
            save_checkpoint(epoch, model, optimizer, best_val_loss, checkpoint_dir)
            early_stopping_counter = 0
            # Save model checkpoint if desired
        else:
            early_stopping_counter += 1
            if early_stopping_counter >= patience_threshold:  # Define your patience threshold
                print("Early stopping triggered")
                break

        scheduler.step()

def save_checkpoint(epoch, model, optimizer, best_val_loss, checkpoint_dir):
    state = {
        'epoch': epoch + 1,
        'state_dict': model.state_dict(),
        'optimizer': optimizer.state_dict(),
        'best_val_loss': best_val_loss
    }
    filepath = os.path.join(checkpoint_dir, f'model_epoch_{epoch+1}.pth')
    torch.save(state, filepath)
    print(f"Checkpoint saved at epoch {epoch+1}")


def train_one_epoch(model, train_loader, criterion, optimizer):
    running_loss = 0.0
    start_time = time.time()
    batches = 0

    for i, batch in enumerate(train_loader, 1):
        curr_batch = i
        inputs = batch['audio']
        # print(f"Input shape: {inputs.shape}")  # Add this line

        # Convert stereo to mono by averaging the channels
        inputs = inputs.mean(dim=1).to(device).float()  # Averaging across channel dimension

        # print(f"Input shape: {inputs.shape}")  # Add this line


        tone_labels = batch['tone_label'].to(device)
        sound_labels = batch['sound_label'].to(device)

        # Zero the parameter gradients
        optimizer.zero_grad()

        # Forward pass
        tone_outputs, sound_outputs = model(inputs)
        loss_tone = criterion(tone_outputs, tone_labels)
        loss_sound = criterion(sound_outputs, sound_labels)
        loss = loss_tone + loss_sound

        # Backward pass and optimize
        loss.backward()
        optimizer.step()

        running_loss += loss.item()

        # Calculate elapsed time and estimated time remaining
        elapsed_time = time.time() - start_time
        avg_time_per_batch = elapsed_time / i
        estimated_total_time = avg_time_per_batch * len(train_loader)
        time_remaining = estimated_total_time - elapsed_time

        # Console feedback
        if i % 20 == 0:  # Adjust this value based on your preference
            print(f"Batch [{i}/{len(train_loader)}], "
                    f"Training Loss: {running_loss/i:.4f}, "
                    f"Elapsed: {elapsed_time//60:.0f}m {elapsed_time%60:.0f}s, "
                    f"Epoch ETA: {time_remaining//60:.0f}m {time_remaining%60:.0f}s")
    return running_loss/curr_batch

def validate_model(model, val_loader, criterion):
    model.eval()  # Set the model to evaluation mode
    val_loss = 0.0
    correct_tone = 0
    correct_sound = 0
    total_samples = 0

    with torch.no_grad():
        for batch in val_loader:
            inputs = batch['audio']
            inputs = inputs.mean(dim=1).to(device).float()  # Convert to FloatTensor

            tone_labels = batch['tone_label'].to(device)
            sound_labels = batch['sound_label'].to(device)
            total_samples += inputs.size(0)

            tone_outputs, sound_outputs = model(inputs)
            val_loss += criterion(tone_outputs, tone_labels).item()
            val_loss += criterion(sound_outputs, sound_labels).item()

            _, predicted_tone = torch.max(tone_outputs.data, 1)
            _, predicted_sound = torch.max(sound_outputs.data, 1)
            correct_tone += (predicted_tone == tone_labels).sum().item()
            correct_sound += (predicted_sound == sound_labels).sum().item()

    val_acc_tone = 100 * correct_tone / total_samples
    val_acc_sound = 100 * correct_sound / total_samples

    return val_loss / len(val_loader), val_acc_tone, val_acc_sound

def calculate_metrics(outputs, labels):
    _, predicted = torch.max(outputs.data, 1)
    precision = precision_score(labels.cpu(), predicted.cpu(), average='macro')
    recall = recall_score(labels.cpu(), predicted.cpu(), average='macro')
    f1 = f1_score(labels.cpu(), predicted.cpu(), average='macro')
    return precision, recall, f1
And for the training itself, I chose to do 100 epochs, and I ended up with my best results yet! 99.9% tone accuracy and 93.3% sound accuracy!
Unfreezing and fine-tuning HuBERT
With the latest results, I was confident I could do a little better. I knew that I could, at the very least, get 100% tone accuracy. And my goal was ~95% sound accuracy.
This time, I decided to unfreeze more layers - training the last 3 layers of the Pinyin Model (rather than just the last layer consisting of my custom classifiers). Technically speaking, previously I was not actually adjusting weights on the base model, so it could be considered feature extraction using a frozen model to feed into my own custom models which were fine-tuned through the training epochs. In essence, I was relying on HuBERT's pretrained weights to handle all of the audio analysis, and training a small network on top to interpret the HuBERT vector representation of various audio inputs.
With some HuBERT layers unfrozen, this time I would technically be partially fine-tuning the HuBERT model itself, hoping that a few of the most superficial layers could be trained to better recognize speech intricacies related to my task. This would have an effect on how the audio data is being interpreted and represented upstream of my ultimate classifier heads.
hubert = torchaudio.pipelines.HUBERT_BASE.get_model()

# Instantiate your custom model
num_tones = 4  # Mandarin has four tones
num_sounds = 410  # The number of unique syllables in your dataset
pinyin_model = PinyinModel(hubert, num_tones, num_sounds)

num_transformer_layers_to_unfreeze = 3  # for example, last 3 layers
for i in range(-1, -num_transformer_layers_to_unfreeze - 1, -1):
    for param in pinyin_model.backbone.encoder.transformer.layers[i].parameters():
        param.requires_grad = True

# Unfreeze tone and sound classifiers
for param in pinyin_model.tone_classifier.parameters():
    param.requires_grad = True
for param in pinyin_model.sound_classifier.parameters():
    param.requires_grad = True
I also added another augmentation which randomly inserted silence at the start of each audio file. This more closely mimicked the reality of spoken language (which sometimes has variable gaps before sounds!).
def add_random_silence(self, audio):
  # Generate a random duration between 0 and 0.25 seconds
  max_silence_length = 0.25  # in seconds
  silence_length = random.uniform(0, max_silence_length)

  # Calculate the number of silence samples
  num_silence_samples = int(self.sampling_rate * silence_length)

  # Determine the number of channels in the audio
  num_channels = audio.shape[0] if audio.ndim == 2 else 1

  # Create a tensor of zeros (silence) of this length
  silence_tensor = torch.zeros(num_silence_samples)

  if num_channels > 1:
      # If audio is 2D, replicate silence_tensor to match the number of channels
      silence_tensor = silence_tensor.repeat(num_channels, 1)

  # Concatenate the silence tensor with the audio
  padded_audio = torch.cat([silence_tensor, audio], dim=1) if num_channels > 1 else torch.cat([silence_tensor, audio], dim=0)

    return padded_audio
And at the end of 50 epochs of training over ~6 hours: 100% and 98% accuracy (tone and sound, respectively)!
This was the point where I figured I could stop and consider my task complete!
Final results
For those who made it to the end, a refresher of how we got here:
- While traveling China, I wanted a tool to help me drill Mandarin pronounciation, specifically to better read Pinyin representations and represent the different tones.
- I found a dataset that could help, and trained a neural network that can take audio and classify it as a tone and a Pinyin spelling
Now I needed to use it, ideally on the go. Also, I really didn't want to pay for a server to host the model, hoping to be able to statically serve it from Cloudflare in some way
So I researched options where I could run inference with a machine learning model on the client (e.g. user's mobile device or browser). I learned about the various options like transformers.js, tensorflow.js, and onnx runtime.
First, I exported the model into the open ONNX format for compatibility, then I worked on integrating the the model onto a webpage. I had issues with transformers.js and tensorflow.js due to PyTorch operations used in HuBERT that were not yet supported in the JS implementations, so I landed on onnxruntime.
So I finished up the static web page, hosted it on Cloudflare Pages, and hosted the model in Cloudflare's R2 storage, all for free!
After a bit of front-end work, I had finally finished my tool, give it a try here!
Unfortunately, I was unable to get the 300+ MB model working for client-inference on mobile browsers (yet), but given the large size, and my reliance on roaming data while traveling internationally, a web-based tool that only works on the laptop is okay for my needs.
Conclusions
With the model done, and now the tool usable, I felt extremely accomplished!
Unfortunately, it was not finished in time to help me practice Mandarin before my 2 month visa stay ran out, but I learned a tremendous amount!
I got first-hand experience with a machine learning problem based on a real-life problem, identified an architecture, found a dataset, and trained a model that satisifed my requirements! And on top of that, I got some good experience in deploying the model to the web, something I had not spent much time on in the past.
Specifically with this scenario, I learned a lot about audio, especially different data augmentation strategies like stretching, shifting, and silence insertion.
In any case, now I know where I will go to brush up before my next trip to China!